1.安装
方法一:直接用指令sudo apt-get install fio
方法二:如果方法一不可行则,在官网http://freshmeat.net/projects/fio/下载fio的安装包。安装方法很简单。解压缩后,进入目录输入./configure make make install。不同压缩格式的解压书指令不同,具体请参考如下eoiioe博客:
http://www.cnblogs.com/eoiioe/archive/2008/09/20/1294681.html
2.测试注意点
可以先把设备mount到文件加上,如
mkdir /mnt/sdb1-mount
mount /dev/sdb1 /mnt/sdb1-mount。
mount上之后可以进行如下测试(ps:你如果想看mount成功了没,直接mount后回车,可以看到mount的东西):
注意 fio测试指令需要在root权限下才能操作
fio -filename=/mnt/sdb1-mount/text -direct=1 -rw=read -bs=1m -size=5G -numjobs=4 -runtime=10 -group_reporting -name=test_read
第一个text是运行完后在/mnt/sdb1-mount目录下会生成一个5G的text文件。
第二个text_read是测试运行结果在屏幕上显示的都是以test_read:。。。
3.关于参数:
-filename 后可以直接加设备名 如-filename /dev/sdb1 ;也可以加设备的挂载点的文件名,如上述例子。
size 读写的总大小
bs blocksize 每次读写的大小
-direct=1 测试绕过机器自带的buffer,测试结果更真实
-rw的5中情况 1.-rw=read 2.-rw=randread 3.-rw=write 4.-rw=randwrite 5.-rw=randrw -rwmixread=70 //混合模式下读占百分之70
numjobs=4 本次测试的线程数为4
ioengine=sync io引擎的方式为同步。通常有同步和异步两种方式。同步的io一次只能发出一个io请求,等待内核完成才返回,这样对单线程来说iodepth总是小于1的,但多个线程并发可以使iodepth变大。异步方式就是一次提交一批请求,等待一批的完成,减少交互的次数
-group_reporting 关于现实结果,汇总每个进程的信息
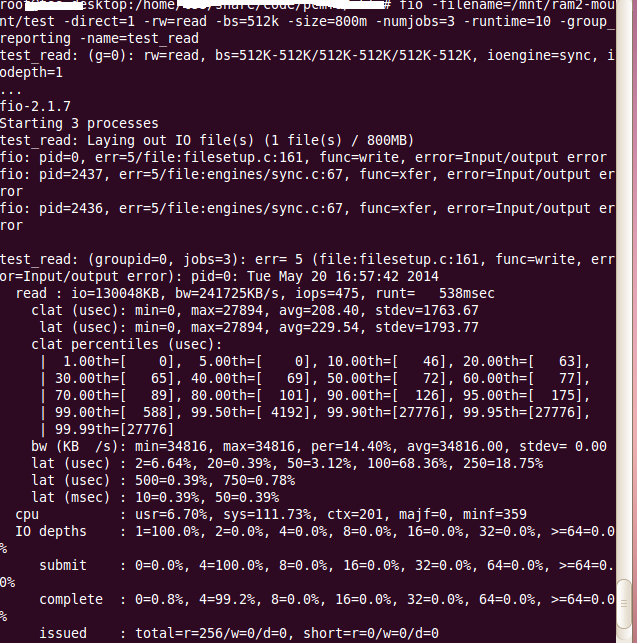
4注意:.若将设备挂载在虚拟硬盘上,即ram*,那么注意,-size的值不能过大,因为分配的ram大小是固定的,若-size的大小超过了系统分配你ram的大小,则会出现error。error信息如下:

这时相当于ram被弄崩了~此时,你需要1.umount;2.重新格式化ram*;3.重新挂载
5.关于测试脚本
[global]
direct=1	#use raw io instead of buffered io
numjobs=1	#number of clones of processes/threads for each job
ioengine=sync	#libaio is asynchronized io mode, sync is synchronized mode
iodepth=1	#if use libaio, iodepth means the ios can be submitted at the same time. It is important! (Can be thought as number of thread/process in sync io mode)
iodepth_batch_complete=0 #how often to check request completion for libaio.
#iodepth_low=4	#if io queue is full, wait completion until depth reach this.
runtime=200	#in seconds for each job
thread		#use thread instead of process
filename=/home/test.bin        #the device/file name
size=10M
rw=randwrite

[BS:1K]
bs=1k

[BS:2K]
stonewall  #wait until the previous job is finished
bs=2k

[BS:4K]
stonewall  #wait until the previous job is finished
bs=4k

[BS:8K]
stonewall  #wait until the previous job is finished
bs=8k

[BS:16K]
stonewall  #wait until the previous job is finished
bs=16k

[BS:32K]
stonewall  #wait until the previous job is finished
bs=32k

[BS:64K]
stonewall  #wait until the previous job is finished
bs=64k

[BS:128K]
stonewall  #wait until the previous job is finished
bs=128k

[BS:256K]
stonewall  #wait until the previous job is finished
bs=256k

[BS:512K]
stonewall  #wait until the previous job is finished
bs=512k
其中globle为全局共享参数;[BS:1K]为运行打印出代码的名字
假设该文件保存名字为runfiotest.ini,则运行指令为
fio runfiotest.ini
6测试结果
下面给出一段测试结果
BS:1K: (groupid=0, jobs=1): err= 0: pid=2467: Wed May 21 15:52:27 2014
  read : io=10240KB, bw=13456KB/s, iops=13455, runt=   761msec
    clat (usec): min=0, max=2018, avg=66.88, stdev=28.71
     lat (usec): min=0, max=2018, avg=67.90, stdev=29.56
    clat percentiles (usec):
     |  1.00th=[    0],  5.00th=[   62], 10.00th=[   62], 20.00th=[   63],
     | 30.00th=[   63], 40.00th=[   66], 50.00th=[   66], 60.00th=[   67],
     | 70.00th=[   67], 80.00th=[   67], 90.00th=[   70], 95.00th=[   87],
     | 99.00th=[  131], 99.50th=[  143], 99.90th=[  278], 99.95th=[  314],
     | 99.99th=[  756]
    bw (KB  /s): min=13290, max=13290, per=98.77%, avg=13290.00, stdev= 0.00
    lat (usec) : 2=3.03%, 4=0.01%, 10=0.02%, 20=0.08%, 50=0.21%
    lat (usec) : 100=93.09%, 250=3.43%, 500=0.11%, 750=0.01%, 1000=0.01%
    lat (msec) : 4=0.01%
  cpu          : usr=18.95%, sys=80.53%, ctx=32, majf=0, minf=11
  IO depths    : 1=100.0%, 2=0.0%, 4=0.0%, 8=0.0%, 16=0.0%, 32=0.0%, >=64=0.0%
     submit    : 0=0.0%, 4=100.0%, 8=0.0%, 16=0.0%, 32=0.0%, 64=0.0%, >=64=0.0%
     complete  : 0=50.0%, 4=50.0%, 8=0.0%, 16=0.0%, 32=0.0%, 64=0.0%, >=64=0.0%
     issued    : total=r=10240/w=0/d=0, short=r=0/w=0/d=0
     latency   : target=0, window=0, percentile=100.00%, depth=1
blocksize,iops,bw的关系。块大小(bw)*每秒io次数(iops)= 带宽(bw)
注意read : io=10240KB, bw=13456KB/s, iops=13455, runt= 761msec这一行:
当配置文件设置的runtime小于761ms时,则read的io量达不到10240K,所以说一个测试正常结束有两个原因:1.io达到了配置文件的需要io操作的大小,即size值。2.运行达到了设置的时间。
故若你想保证运行时间足够长,可以不设置runtime的值。
其中
read : io=10240KB, bw=13456KB/s, iops=13455, runt= 761msec
io表示本次请求的大小io=10240KB 可以看出我们上面设的size=10M相对应。当然也存在runtime时间用完了,而fio未运行完毕,这是io小于size值,而runt 等于设定的runtime
总体介绍如下
io=执行了多少Mio
bw=bandwith表示带宽。
iops表示每秒的io数量
slat 提交延时
clat 表示complete lantency 完成延时
lat 表示 响应延时
cpu 利用率
IO depth io队列
IO submit 单个IO提交的IO数
IO complet 单个IO完成的IO数??
IO issued 读、写下发的请求书。and how many of them were short
IO lantencies=IO完成的延时分布
IO=总共执行了多少size的IO
aggrb=group总带宽
minb=最小平均带宽
maxb=最大平均带宽
mint=group中线程最短运行时间
maxt=group中线程最长运行时间
ios=所有group总共执行的IO数
merge=总共噶生的IO合并数
ticks=Number of ticks we kept the disk busy
in_queue=在队列中花的时间
util=磁盘利用率
以上参数参考
http://blog.csdn.net/yuesichiu/article/details/8722417
若用ram模拟硬盘测试,会发现以上五项的值都为0。而在/home目录下做fio测试就不会为0了
6.关于格式化ram后的ext4测试 & 基于/home目录下(ext4文件系统)的fio测试。
虽然都是ext4文件系统,但是ram的内存模拟硬盘,而/home是直接在硬盘下跑,故ram的测试结果中bw iops 要比/home下大很多,运行时间小很多。
2021年8月08日 14:40
I am happy to find this post very useful for me, as it contains lot of information. I always prefer to read the quality content and this thing I found in you post. Thanks for sharing. 123movies websites
2024年1月18日 15:46
JNANABHUMI AP provides all latest educational updates and many more. The main concept or our aim behind this website has been the will to provide resources full information on each topic which can be accessed through Internet. To ensure that every readers get’s what important and worthy about the topic they search and link to hear from us. jnanabhumiap.in Jnanabhumi AP is a startup by passionate webmasters and bloggers who have passion to provide engaging content which is accurate, interesting and worthy to read. We are mope like a web community where you can find different information’s, resources, topics on day to day incidents or news. We provide you the finest of web content on each and every topics possible with help of editorial and content team.